
CLICK HERE FOR FREE BLOG LAYOUTS, LINK BUTTONS AND MORE! »

My Pages

Showing posts with label Cricutless. Show all posts

Friday, April 6, 2012

Dilly Beans Friday Challenge - Easter

Good morning all my wonderful and thoughtful bloggy friends,

How much I love you all - old friends and new friends, alike.  I have been overwhelmed by your kind words and honest replies to my posts lately.  Bless you all.  I still want to write a follow-up post, but have been very happily busy actually crafting a little more lately so that comes first for now.  I haven't forgotten I need to draw a blog candy winner for the St. Patty's day hop as well.  Sorry for my tardiness!  To my friend, Leanne, I have not forgotten about you either and to several of my friends, I have cards to get out to you as well.  It's all here on my mind, I just haven't had the cooperation with my body yet, but I'll get there and want you all to know I never forget the kindness you have all shown me in so many different ways, be it cards and gifts or comments and emails.  I appreciate it all. :)

First off I just have to say thank you to Megan for her sheer awesomeness and amazing talent that inspires me to no end!  Thanks for giving me the opportunity to join your team for the month of April and possibly more. ;)  And thank you for being so incredibly sweet and understanding when it comes to my Fibro.

Today I am super excited as it's my first Friday Guest Design spot for the lovely Megan and the talented gals at Dilly Beans Designers & Friday Challenge Blog.  As I mentioned in my earlier post, Megan had said I could do up to four projects for each challenge and believe it or not, I have actually accomplished that task (at least for this first challenge, still working on the others)! ;0)  My first two projects for the Easter Challenge are some of Dilly Beans' (DB) cute country style images.  The second two projects are some of the darling people images that are available in the STORE.  Okay, well one is actually not quite a person, it's a zombie bunny, but she has a personality all her own. ;0)

Let's get on to the projects, shall we?  Don't forget to click on the pics to see them in a larger format for better details.  Project details are listed below each individual project.

 Project 1 - Outside of card
 Project 1 - Outside Closeup
Project 1 - Inside of Card

For Project 1 I used the Posie Bunny digi stamp from DB, colored with Copics.  I'm very happy with the way this turned out.  I just decided to kind of play around with them and see what I could do.  I made the bow a peachy color with some lovely peony colored polka dots and I am just loving the way the floral bouquet turned out.  I had so much fun with this image!  I purchased a lot of my Copics from Fluorishes, LLC.  They have great sets of three or four Copics that won't cost you an arm and a leg, and it's a wonderful way to build your collection!  

The card itself, is cardstock from Recollections and the printed papers are from my stash.  I used a random basket rubber/wood stamp that I had on hand and stamped the image onto patterned paper, which I also used for the background of the inside of this card. I then fussy cut around the basket and also the inside of the basket.  I wanted the bunny to show through, so I cut out a window in the purple cardstock as well. Then I popped up the basket with some pop dots. I used a clear Easter egg stamp (all over) to make the background on the front of the card.  I stamped it, using a rainbow pad from Joann's.  The "Happy Easter" scroll stamp is one I found in the $1 bin at Michael's, inked with Stampin' Up Basic Black.  Perfect for many projects! I then added a bow to the basket from Really Reasonable Ribbon.  I always love buying my ribbon from them.  Fabulous company with great prices!  

For my second project, I decided to make a card that went with Project 1, so I used many of the same elements.  Again, please click the images to get a better idea of the details/colors.  The background of this card is actually a minty green from Recollections.

 Project 2 - Outside of Card
 Project 2 - Inside of Card, Left Side
 Project 2 - Inside of Card, Right Side
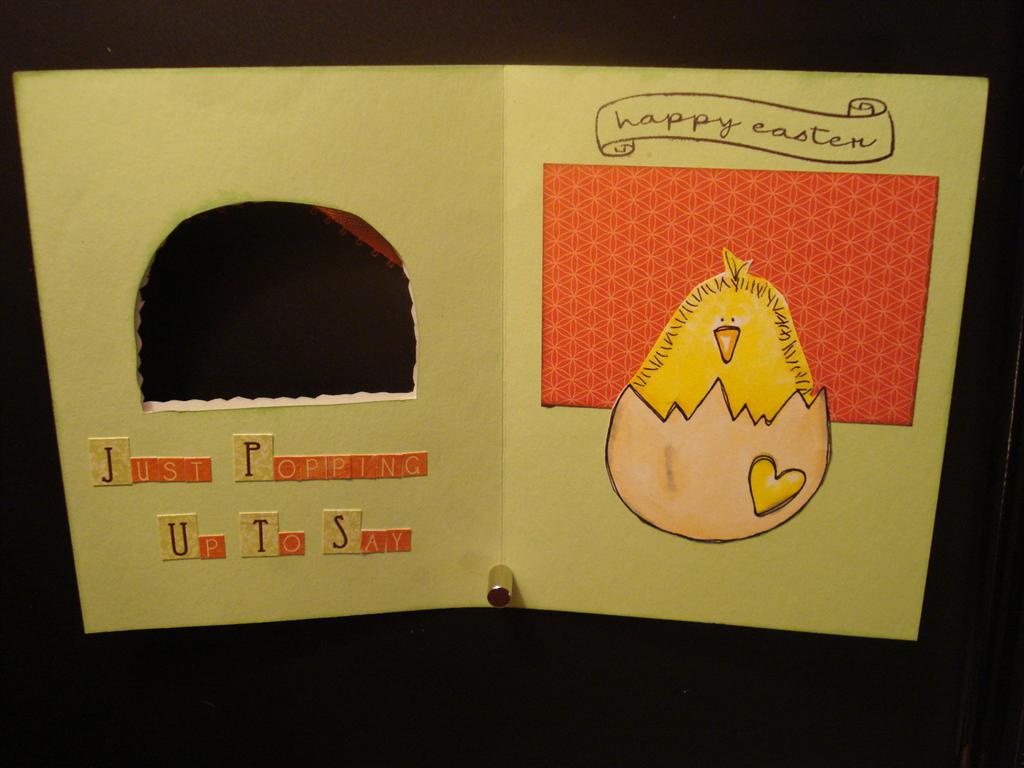
Project 2 - Inside of Card

For Project 2 I decided to use the "Hatching Chicky" from DB stamps.  I printed it out on white cardstock and OMGosh I was soooooo amazed at the line thickness and quality of these (all DB) images when I printed them!  I used my Copics again to color the egg and the chicky and used several different colors in the same family for both the egg and the chick, with a touch of gray for some shadowing.  This is a perfect image for Easter, as well as for many other occasions if you want to use it for one of those "Hey Chick" or "Popping up to See You" type of cards.

For this one, I used a green patterned paper from my stash to stamp the basket on and then I outlined it with my black Zig pen (did the same for Project 1) just to make it look a little sharper.  I fussy cut the basket and the window again with a craft knife (mine's from Doodlebug) and it surprisingly wasn't nearly as difficult or time-consuming as I thought it would be!  I popped up the basket again and then I added some orange Offray ribbon for the bow to finish it off.

Again, I stamped the background of the front of the card with that same clear egg stamp and I used two different shades of Martha Stewart ink.  Love the way it looks in person.  Sorry the pics don't quite do it justice.  I also inked around the edges of the card with the MS ink as well.

For the inside of the card I wanted to create my own sentiment so I used some darling stickers from Bo Bunny.  Can look up the exact sheet if you would like. ;0)  Behind the chicky I used a gorgeous paper from Stampin' Up because I just really wanted the yellow chicky head to stand out.  I love the combo of those colors together.  I inked my edges and then added the same Michael's stamp and the Dilly Beans Hatching Chicky image.

The 3rd Project was created using the first image I fell in love with from Dilly Beans, the Zombie Bunny.  OMG, I just LOVE her so very much!!!  I am so incredibly happy with the way this one turned out and I hope you will all love her as much as I do.  :0)  This is so out of my normal realm of images that I use for my projects and this is just the beginning of this style.  I have many more that I'm working with from DB and I have finally decided that it's ok to create things I love, without having to have a specific person in mind to send them to.  It took me a while to grasp that concept! LOL  

I decided to keep this project super simple and just let the image shine.  I went over paper after paper and layout after layout and decided that simple was simply  the best. ;)  Again, click the pics for a large image!  The colors are soooo fun!

 Project 3 - Outside of Card
Project 3 - Closeup of Image

Alrighty, for this lovely little Zombie Bunny I just had the best time coloring her!  I used a lavender/grey tone for her face, with olive green eyelids.  I used yellow and orange shades on her hair and her jacket is pink with purple.  The carrot has two shades of orange and two or three shades of green.  Her background has two shades of green and I used the colorless blender to give it a fun effect.  I decided to leave the black/white border as is and I fussy cut around the whole image. 

I didn't want to do anything to detract from the image so I chose papers that bring out every color.  I was stoked to see that I had papers that, to me, were so perfect for this project.  The three strips are all from Stampin' Up. (SU)  I tell you, I just adore their paper lines!  Stop over and say hi to Jill and please tell her Amy Jo (Courchaine) sent you!!!  She is a wonderful consultant!

The background of the card is again, that same mint green cardstock from Recollections and the layer on top of that is another green print I had in my stash (note it is the same line as the yellow from the Posie Bunny card and the green from the Hatching Chicky card).  I decided I wanted to distress it a bit so I used my emery board and roughed it all up, as well as inking it with my Martha Stewart ink.  I inked the actual cardstock as well.  The strips of SU paper were inked with Rust SU ink.

The inside of this card is still in progress...  I need some help here.  I want to make up a quirky "Little Bunny Foo-Foo" type of poem/sentiment, but haven't quite figured it out yet.  Doesn't she look like a perfect Little Bunny Foo Foo?  I mean, she was a little demented right? ;0) LOL  Thing is, I couldn't decide if this darling Zombie Bunny should be Little Bunny Foo Foo or if the Amalia Easter Bunny in the next project would make a better Little Bunny Foo Foo.  I'm almost thinking the Amalia one is too sweet to be dubbed that title though.  Help me decide friends!  I would LOVE to get your input and then I'll show you the inside after WE decide. ;)  Check out this next project and let me know what you think!

Sorry friends, got in a flare before I could finish Project 4 and decided instead to use it for one of the upcoming Dilly Beans challenges.  Look forward to that post later this month!!!  Here are the details (a teaser for you) of the project as well as a picture of the image I will be using for this project that way you can help me decide still for the Little Bunny Foo Foo question. :0)

 For Project 4 I used the brand new Amalia Easter Bunny!  OMG, did I squeal when I saw her in the store!!!  I'm not kidding, I emailed Megan immediately and said I MUST have her! LOL  Oh, I just fell in love with her darling little bunny body and I hope you all will too.  I did this one in colored pencil and I am very happy with the simplicity of that.
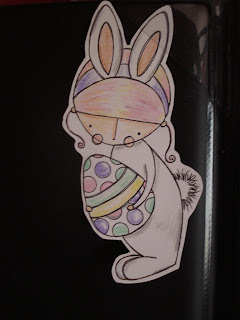


Again, I decided to "match" her to the Zombie Bunny card and will likely use the same paper lines and general colors for her.  I colored her in colored pencils and by no means, do I have any idea when it comes to shading and highlighting, but I still love her just the same.  (Hence the need for some classes here.) ;0)  I decided I didn't want to fussy cut her as close as I have been doing the other images because I thought she would look lovely with just a small border around her so I cut her with my scissors and just eyeballed the distance.  I'm very pleased with this effect!


Alright friends, now it's your turn to link up your projects at Dilly Beans Challenge Blog for your chance to win some free digis!.  I thank you all so very much for stopping by today and please do leave your comments.  Don't forget the Little Bunny Foo Foo conundrum!  Also, even if you don't enter the challenge at Dilly Beans Challenge Blog, I would love for you to stop by there and check out the amazingly talented designers work and leave some love there too and become a follower if you like what you see.  Tell them I sent ya!  One thing you really don't want to miss is the Dilly Beans Store so you can purchase some of these awesome images.  Megan's store is huge!  She has so many images, I was truly stunned!  Can't wait to hear what you all think & please come back here and tell me what you purchase if you do make a purchase!  Maybe, oh just maybe a little tiny bribe here I will do... ;0) -- If you purchase something from Dilly Beans and come back here and leave me a comment telling me what you bought, I will choose one or two random winners to pick out a card I have made that they would like to have.  It doesn't have to be these, it can be any one from my blog postings (as long as I still have them - or I can make a duplicate if you find one you really want).  How does that sound?  :0)

Have fun shopping and creating, my Darlings!

XO ~ Amy Jo

Challenges I'm entering:

Zombie Bunny Card - Beyond the Burtonesque Dolls - Rotten Eggs for a Wicked Easter Challenge

Friday, January 13, 2012

My First Guest Design Spot

Hi there! I am so excited that Tina from Crafty and Green has been kind enough to have me as a Guest Designer!  This is my very first Guest Design spot!  I would love it if you would swing by her site to catch my post over there and leave a comment either here or there, or both, please!  We would love to hear from you.  I have sent her some bio info about myself that some of you may not be aware of so it might be fun for you to check that out and also she's having lots of super fun things going on right now on her blog.


I have listed my project in great detail here, and I warn you, it's quite a long explanation of actually creating the card.  If you skip through and just check out the pics, I won't mind. ;)


For today’s project, I have used Tina’s sketch and theme (music) for January as my inspiration.  I chose to do a card and yes, it will be up for sale in my store soon!  I have a few pictures here for you all to see the details.  The details on how I made the card are below…


1 Front of Card - Inside is Blank (for now)
2 Closeup of Bird Stamped on Chipboard and Crinkle Ribbon

3 Closeup of Sentiment, Punched Edge, and Popped Flower with Note
4Closeup of stamped background paper and popped flower

First off I cut a white piece of Recollections card stock down to 10”x7”, scoring it with my Martha Stewart Score Board to make the fold at 5”, making the finished card 5”x7”. 


Next I cut down a piece of polka dot patterned paper from my stash, rounded the corners with a corner rounder and inked the edges with a Colorbox Cat’s Eye – Dark Brown ink pad. I adhered it to the white card stock with my ATG.

After that, I cut down a piece of plain coordinating yellow paper and stamped the background with Stampin’ Up – Summer Sun ink, then again with Stampin’ Up More Mustard ink, using a stamp that I won as blog candy by Stampendous – Cling Music Score (again, sticking with our music theme here).  I punched one edge of that same paper with a Fiskars punch (which broke after I did that one edge and that is why both edges were not identical L) and finished by inking all the edges again with the Colorbox Ink. I actually liked the way it looked with only one edge punched.  It made it unique. J  Then, I adhered it to the patterned paper with my ATG. 


Next up, I fussy cut six flowers from that same paper line in my stash (it’s a generic brand) and cut out the center circles with an X-acto. I then used my 1” punch and cut out six more flowers with it to layer under the flower borders with the circles cut out so the yellow background would not show through and to add a little more texture.  I inked all my edges of the circles and the flowers and put them together by first running them through my Xyron and then layering -- 1.) 1” flower circle 2.) fussy cut flower border 3.) stamped the remaining flower circle centers with black pigment ink, a note stamp from Fiskars, and used Stickles, a Zig pen, and a white gelly roller to make them really defined 4.)  put a pop dot on the back of the note-stamped centers and went around the pop dot edges with my black Zig marker so if you look at the side it won’t be so noticeable – great trick btw ;), then added them up and to the side a little of the flowers that were already pasted down to create a bit of a shadow.  Notice the flower centers on the bottom layer are a different color than the pop dotted ones. 

The next step I did was to add a gorgeous piece of 3 Girls Jam ribbon in Goblin Green, which I had also won as blog candy!  I decided to leave it wrinkled and to make it stay that way I first put down a line of ATG adhesive, then kind of smooshed the ribbon on top of that.


To stick with the music theme I found this perfect little bird stamp (notice he’s singing) J from Inkadinkado, to go with my music notes.  I found a great chipboard embellishment from my stash and decided to ink him on to it by using StazOn ink.  Since the pattern still came through I wanted to color my bird in so I used Pearl Ranger Ink to color him in.  I then took my orange Zig marker to add some color to the beak and music note, and finished off by adding some more white detail with my white gelly roller.  I then glued down the embellishment with Tombow liquid adhesive and outlined around the embellishment with my black Zig pen to make it “pop”.

Finally, I added some Palette glue from a glue pad to the yellow part of the card and sprinkled all over with Holiday Glitter in blue that I also won as blog candy and then I added the cute sentiment which was from the same stamp set.

There you have it!  I’m sorry for the super long instructions, but as simple as this card looks, there were a lot of steps involved to create it!  


Thanks so much for joining us today and I really hope you’ll pop over to my personal blog to become a friend and follower.  Thanks again to Tinaeco-friendly.  She's the kind of gal I'm proud to call my friend!

XO ~ Amy Jo   

Friday, January 6, 2012

Snow Days Blog Hop - Day 1 of 2


Welcome to the Snow Days Blog Hop!!  This is day one of two.

We're so happy you could join us for this super-fun hop showcasing cards, layouts and projects that feature everything about Snow Days!! You'll find an array of ideas throughout the hop -- We hope you'll enjoy each and every project along the way!!

If you'd like to join our Snow Days Fun, then you are in the right place. Keep alert for blog candy along the way as some hop stops will be offering some goodies...

For the hop today, I've created a cute winter card with a snowman theme.  I apologize for all the pics, but in order to show off everything properly I have to take pics both with and without the flash.  One of these days I'll get a light box built and won't have this problem.  Thanks for bearing with me. :0)  This was a super simple card to create, but it turned out to be one of my faves this season.  The papers are from Basic Grey - Jovial Collection (I believe) and the cute little snowman and sentiment are clear embellishments from Deja Views.  I just love them! Hope you do too. :)

 I just love these papers together (notice the one on the left is actually a snowflake pattern) and they coordinate so well with the Deja Views!
 With a flash to see the paper colors a bit better, but then of course the vellum tape shows too ;)  I used pop dots on the snowman.

Sorry so blurry here!  I inked all my edges as usual with Colorbox Cat's Eye inks.

Thank you again for checking out my project... Now hop on over to Mickie!

Here's a list of the entire hop, in case you get lost along the way or want to revisit anyone:

Lisa P - http://handmadewithlove-lisa.blogspot.com/ You are here!!!
Bonnie - http://scrap-n-away.blogspot.com/ You go here next!!!
Sherry -http://www.upordowntheyrebeautiful.blogspot.com/
Doris - http://mybugandmecreate.blogspot.com/
Theresa D: http://scrappinginheels.blogspot.com/
Beckie http://justbcreativecrazy.blogspot.com/
Erin - http://deeplyrootedlife.blogspot.com/
Amy - http://www.lovetocrop.com/
Eva - http://evasscrapsncards.blogspot.com/
Cathie-http://cathiescafe/-scraphappy.blogspot.com/
Ashley - http://especiallymade.blogspot.com/
Lisa G - http://www.bljgraves.blogspot.com/
Melissa - http://timeweavers.wordpress.com/
Kristen - http://fantabulouslypink.blogspot.com/
Theresa - http://scrappyartcrafters.blogspot.com/
anita- http://www.anitaandbugs.blogspot.com/
Lynne - http://slasewcraftiness.blogspot.com/
Barbara B. http://barbarab3.blogspot.com/
Amy Jo - http://lv2scrapandfibrofacts.blogspot.com/
Mickie - http://www.littlescrapcorner.blogspot.com/
Janet Royer- http://janetscreativieworld.blogspot.com/

Thanks for stopping by, please come back tomorrow for another great project!

Thursday, December 22, 2011

12 Days of Christmas Blog Hop - Day 12


Good morning Crafty Friends!

Welcome to Day 12 of the 12 Days of Christmas Blog Hop brought to us by Lisa of HoneyBearz Designs.  This is a 12 day hop where we will be showcasing Christmas/Holiday projects of all types!  Be sure to stop by and follow each blog (comment each day) for your chance to win many, many sponsored prizes and Lisa's goodies too!  I have a feeling there will be blog candy along the way for you to win as well. :)

If you've arrived here from Anita ~ Anita & Bugs then you are in the right spot!  If you just happened upon my blog then you'll want to get all the juicy details at the beginning of the hop with Lisa (above).  Thanks for stopping by today!  I'm super excited for this challenging hop.  I love hops that make me be more productive than I normally am! LOL It's a great challenge for myself.  I just can't wait to see what every one else has been creating this season so I will list all the stops below for an easy way to find everyone.

Awww, we are at the end of our hop and I must say, I'm pretty sad!  I love posting a project every day and this hop has really motivated me to do that! ;)  I hope you all have had fun and to my fellow stops on the hop, I will be making my way through today.  I hope I will have enough time in my day cause I don't wanna miss anything!

For the final project I have, of course, another Christmas card to show you.  I made this one for a client and I really like how it turned out.  I only wish I had more of this gorgeous embellishment!  Very simple card to do. I am posting photos with a flash and without a flash, as both ways enhance different aspects of the card.


For the card itself, I used notebook style paper from Basic Grey.  Did you see that Cricut has come out with an awesome cartridge for the Imagine to do all different kinds of notebook paper (a trend that I'm really loving)? I simply must have that cartridge!  You can bet I'll be getting it within a month or two.  I think I'll use it a lot really.  Anyways, I embossed the background with the snowflake embossing folder by Cuttlebug on my Big Shot, then I inked across them in blue show they would show up better and to give them a wintry effect.   I inked all of my separate pieces, as usual, then I added a piece of scrap Christmas paper from a 6x6 pack that I have from last year's stash and  added a border from a K&Co. pack of embellishments. I added  the gorgeous floral embellishment by using pot dots, lastly.  It already said "A Merry Christmas" and is from the same K&Co. pack (I think.).  I wish they sold them by themselves, but they come in a large package with lots of other vintagey things. I can look it up if anyone wants to know, which reminds me of a comment I received yesterday regarding the file for my coupon holder... Unfortunately, I don't have a file, but I think I could make one pretty easily or I can get you a picture of the template and the measurements.  Another option is I will be happy to make a kit for anyone who wants one.  If anyone does want one, please let me know and I'll set it up for sale in my store.  I can do the main pieces without patterned paper or I can include patterned paper (your choice of holiday) cut to the correct sizes, depending on what you would like.  They will be pretty inexpensive so don't hesitate to ask!!!  *I believe Blue Crayons left the comment regarding the file... 

I so appreciate everyone who has stopped in during this awesome blog hop.  I am very happy to have received such nice comments and to have made new friends!  Please don't be strangers.  I will have a post up soon with a project from the newest design team I have been accepted as a member of for Paper Piecings by Nikki.  Check back tomorrow for that!

Now you are on to Lynda to see what lovely creation she has in store for us today.  Don't forget to leave a comment and become a follower if you want to enter to win the grand prize!

In case you get lost...


Xo ~ Amy Jo

Tuesday, December 20, 2011

12 Days of Christmas Blog Hop - Day 9


Good morning Crafty Friends!

Welcome to Day 9 of the 12 Days of Christmas Blog Hop brought to us by Lisa of HoneyBearz Designs.  This is a 12 day hop where we will be showcasing Christmas/Holiday projects of all types!  Be sure to stop by and follow each blog (comment each day) for your chance to win many, many sponsored prizes and Lisa's goodies too!  I have a feeling there will be blog candy along the way for you to win as well. :)

If you've arrived here from Anita ~ Anita & Bugs then you are in the right spot!  If you just happened upon my blog then you'll want to get all the juicy details at the beginning of the hop with Lisa (above).  Thanks for stopping by today!  I'm super excited for this challenging hop.  I love hops that make me be more productive than I normally am! LOL It's a great challenge for myself.  I just can't wait to see what every one else has been creating this season so I will list all the stops below for an easy way to find everyone.

On to today's projects.  I decided to show you an old and a new!  The first one is a card using the same paper line (mostly) as the cards on days 6, 7, & 8. This one has two snowflakes that were precut from either the Cricut or a Cuttlebug die.  I added extra Stickles to make it shimmery and inked my edges as always.  I like the burgundy background with the blue.  It's not something I would normally think to pair together, but I pulled the idea from the pretty flowers on the patterned strip of paper.  I added a little brad from Basic Grey to the center of the snowflakes.  I stamped a plain piece of cardstock with the "Merry Christmas" stamp and also added a little star.  Then, to finish it off, I added two strips of ribbon, one silver sheer and one brown.  I got the basic layout idea from a kit (of four) from my local scrapbooking store, so they are not totally my designs, but I always incorporate something to make them my own. ;O)  Again, this is another card from last year.

Now, onto one that I made just this past week!  I decided to really mix up non-traditional patterns and prints this year.  I decided to just go off the wall and start my own sort of holiday trend. ;)  Hope  you like what I've come up with!  Here's the first one...
Look closely or you'll miss the reindeer!

The sentiment stamp happened to land right on a weird spot of the pattern so the last part looks a little funky, but it's not smeared, I assure you. :)

TPC Studio Clear Stamps - Christmas Reindeer Fun
Same images, but mine are not clear.  They are cling stamps, which I'm loving!
I am really happy with the way this one turned out.  I used one of the cutest stamp sets ever, that I picked up at Archiver's last time I was there, called Reindeer Fun by TPC Studio.    Both the reindeer and "Have a Holly Jolly Christmas" are from that set.  I added some red Stickles for the reindeer's nose because, well... don't you just have to? ;)  The papers I picked are Basic Grey (polka dot background, green patterned print, and the red patterned print) and the border and paisley print square were from a punch out sheet from My Mind's Eye - Out & About.  I added a fun brad and some pop dots to add some dimension.  I inked all my edges with ink from Colorbox and used my ATG for adhesive.  I used Stampin' Up ink for the reindeer and the sentiment, in Basic Black.  I'm very excited to get some feedback on this one.  What do you all think of the mixture of patterns, prints, and colors?  I know it's very non-traditional, but it still seems appropriate for Christmas to me!  

I hope you enjoyed my projects today and thank you for stopping by!  Now you are on to Lynda to see what lovely creation she has in store for us today.  Don't forget to leave a comment and become a follower if you want to enter to win the grand prize!

In case you get lost...


Xo ~ Amy Jo

Monday, December 19, 2011

12 Days of Christmas Blog Hop Day 8


Good morning Crafty Friends!

Welcome to Day 8 of the 12 Days of Christmas Blog Hop brought to us by Lisa of HoneyBearz Designs.  This is a 12 day hop where we will be showcasing Christmas/Holiday projects of all types!  Be sure to stop by and follow each blog (comment each day) for your chance to win many, many sponsored prizes and Lisa's goodies too!  I have a feeling there will be blog candy along the way for you to win as well. :)

If you've arrived here from Anita ~ Anita & Bugs then you are in the right spot!  If you just happened upon my blog then you'll want to get all the juicy details at the beginning of the hop with Lisa (above).  Thanks for stopping by today!  I'm super excited for this challenging hop.  I love hops that make me be more productive than I normally am! LOL It's a great challenge for myself.  I just can't wait to see what every one else has been creating this season so I will list all the stops below for an easy way to find everyone.

On to today's project... This is a card using the same paper line (mostly) as the cards on Days 6 & 7. I also used that same cute little snowman stamp and the same Cuttlebug die that the snowman was on for the trees.  Aren't they just sweet?  I got the ideas from a kit (of four) from my local scrapbooking store, so they are not totally my designs, but I always incorporate something to make them my own. ;O)  Again, this is another card from last year.


The button that was added was made by using a circle punch, adhesive, paper piercer for the holes and a clear button.  Now I use my Epiphany punch which I purchased at A Jillian Vance Design to create these.  Much simpler! ;)  Again, I added tulle and a torn sheet of blue just to jazz it up (as my mom would say) a little bit.  Of course, my edges are inked, as always.  Cute, simple, and sweet!

 Thanks for stopping by today!  Now you are on to Lynda to see what lovely creation she has in store for us today.  Don't forget to leave a comment and become a follower if you want to enter to win the grand prize!

In case you get lost...


Xo ~ Amy Jo

Wednesday, September 21, 2011

Witchy Wednesday over at Jillian Vance

Hi Sweeties,

It's time for another awesome Witchy Wednesday over at the A Jillian Vance Design Team blog.  You simply must go check it out and please let them know I sent ya.  We need some new followers over there and trust me, there's some cool stuff on this blog.  Oh, did I mention... you can enter our challenge with a chance to win some goodies!!!  It's an easy challenge so get over there!

For my card I used the "Witchy Poo" set and the "Spooky" set.  Both of these awesome sets are available to purchase here.

 Front of card:  Green paper from stash, "Double Double" paper and witch hat paper from Cloud 9 Design - Seasonal, Martha Stewart drippy goo (not sure of the real name) punch, fussy cut frog from the Cloud 9 Design paper pack & added a Glossy Accented, pop-dotted cat to the tab. Black cardstock is from my stash.
 Inked all my edges with Colorbox - Blackbird, stamped the witch, embossed her, added some black glitter and a bit of Glossy Accents to her dress and put her on a green background, Used my epiphany tag punch to punch out the "double double" from the Cloud 9 Designs paper and pop dotted it.  Stamped the cute broom and fussy cut rather than stamping directly on the paper cause I wasn't sure where I wanted to put it.
 Closeup of the Frog tag with kitty stamp
 My ink didn't work so well on my web stamp so I had to go over it with a gelly roller, then stamped the awesome spider with Staz-on Jet Black ink.  Love the way he turned out!
 Closeup of the witchy poo ;)
 Little better closeup

Just a lil inside tag. :0)  My ink was some crummy stuff I had sitting around so I just outlined the word to make it stand out more.

And there you have it!  My post for today.  Please check back tomorrow for my next Jillian Vance post.  

Have a Craftabulous day and thanks so much for stoppin' by my blog.  I'm always happy to see you. :0)

XO ~ Amy Jo